Post by: jwrape on May 10, 2011, 07:08:40 am
First the Mower:


Now the 86' GT w/ 92k miles:
This is how I got it.


Now with my other wheels on it. Makes it look ten times better. The GT wheels will go on my Sport in the garage


Here is the GT sitting with my G35 at the shop

The car has it's little issues but it's in great shape for a 86'. I drove it to work today.
Both headlight motors are shot
The Check Engine light comes on after driving for 10 minutes.
The Oil gauge pegs unless you are idling and then is jumps around
It has a small exhaust leak I haven't found yet.
AND it has a vacuum leak somewhere cause, it idles at 1400 rpm's and when idling it floats up and down.
It just needs a little loving.
Video of driving it home after trading with the guy.
http://www.youtube.com/watch?v=6yK-SCwlaBw (http://www.youtube.com/watch?v=6yK-SCwlaBw)
Post by: Fierofool on May 10, 2011, 08:09:37 am
The oil pressure sending unit is probably the culprit. First, put a mechanical gauge on it and check pressure at operating temperature idle. Then replace the sending unit with a new one. Bring it up to operating temperature and check the gauge inside the car for comparison. The units available today are very often inaccurate. The BWD brand is the one I've had most problems with. NAPA or AC/Delco is a little more expensive but seem to be closer to correct, right out of the box.
The "Service Engine Soon 10 Minutes After Reaching Highway Speed" syndrome is caused by a leak in the EGR circuit. Remove the line from the EGR valve and with your fingers press up from underneath the valve, against the diaphragm. Cap the vacuum port with your finger, ease off on the pressure on the diaphragm and see if it gradually drops down. If so, you have a hole in the diaphragm. Otherwise it could be a cracked line going back to the EGR, or the little looped line on the EGR solenoid. If it turns out you need the valve or solenoid, I have a couple of good used ones.
Exhaust leak that you can't find is often the forward manifold where the number 6 port joins the manifold runner. Notorious for cracking there. Simple fix is just to drop the rear cradle, remove the manifold and have someone weld it. ;D
The high idle problem sounds like it would be caused by a crack in the EGR tube
Post by: Donster on May 10, 2011, 08:14:46 am
\D
Post by: jwrape on May 10, 2011, 08:17:39 am
Not a bad looking ride. Sometimes you just luck up and find deals like this.
The oil pressure sending unit is probably the culprit. First, put a mechanical gauge on it and check pressure at operating temperature idle. Then replace the sending unit with a new one. Bring it up to operating temperature and check the gauge inside the car for comparison. The units available today are very often inaccurate. The BWD brand is the one I've had most problems with. NAPA or AC/Delco is a little more expensive but seem to be closer to correct, right out of the box.
The "Service Engine Soon 10 Minutes After Reaching Highway Speed" syndrome is caused by a leak in the EGR circuit. Remove the line from the EGR valve and with your fingers press up from underneath the valve, against the diaphragm. Cap the vacuum port with your finger, ease off on the pressure on the diaphragm and see if it gradually drops down. If so, you have a hole in the diaphragm. Otherwise it could be a cracked line going back to the EGR, or the little looped line on the EGR solenoid. If it turns out you need the valve or solenoid, I have a couple of good used ones.
Exhaust leak that you can't find is often the forward manifold where the number 6 port joins the manifold runner. Notorious for cracking there. Simple fix is just to drop the rear cradle, remove the manifold and have someone weld it. ;D
The high idle problem sounds like it would be caused by a crack in the EGR tube
Wow, I didn't even have to troubleshoot. You had it all on the tip of your tongue.
Thanks for the insight. That will definitely give me a direction to look for the EGR issue and the exhaust leak.
That oil gauge thing is just funny to watch at idle.
Post by: jwrape on May 11, 2011, 07:11:38 am
On the way home was a different story.
It was running good until I got into traffic at Hwy 20 and 316. It jumped from 190 to 240 and started boiling real fast. I pulled into Advanced auto and let it cool down.
The fan was working but I think I might have a air pocket in the system, needs to be burped. Also the fan runs and blows ok, but I think it needs a new fan cause it just seemed a little slow. I have a 12" aftermarket fan that I have new from back when I converted my clutch fan Mustang to electric. It should pull a lot more CFM's.
Post by: jwrape on May 13, 2011, 07:14:10 am
I was looking at the car last night and found that the Fan is not coming on when the AC is turned on. It doesn't come on at 235 either.
It did the other day but not now.
I tracked down the relay and unplugged it. I have 10-12v across all four wires. I connected the power wires together and the fan came on immediately. I'm not sure why it's not turning on by itself.
After reading about it, I'm gonna go home and check the Fan switch and then the relay. I think it's prolly the relay because the Fans not coming on with the A/C turned on which doesn't use the fan switch but it does use the relay.
I am wondering if advance auto has the relay in stock
Post by: Fierofool on May 13, 2011, 07:40:02 am
Post by: jwrape on May 13, 2011, 07:47:19 am
You might check the relay on the trunk fan, too. I'm not sure if it's in the temp switch circuit, but since it runs when the fan circuit is energized, that might be an open link in the circuit.
Is that Relay located near that fan? I have not actually even seen that fan yet. I need to get under the car and look around. I might have a second today to look around before I take the kids to putt-putt tonight.
My main goal is to get to the show tomorrow with the car. I can hot wire the fan at the moment. I just need to get a 25amp fuse to do so safely. It works with a wire but it gets warm so I figure a fuse was a better option to get me to the show. I might rob the relay off the other Sport to fix the issue, then i would have plenty of time to get another new one for the Sport.
Post by: Fierofool on May 13, 2011, 08:12:10 am
If you're good at running circuits, you could check the wiring diagram to see if it plays into the normal run circuit.
Post by: jwrape on May 13, 2011, 08:14:33 am
The fan and its relay is in the upper right corner of the trunk where the ledge is, nestled back inside the right fender. Pull the carpet down from the top and you'll find it nestled back there. Probably find a rats nest, too. If you're a camper, save the rats nest. It makes a good fire starter, or so says some Fiero owners who didn't find it.
If you're good at running circuits, you could check the wiring diagram to see if it plays into the normal run circuit.
Cool, Thanks for the info, as always. :-)
I look at it tonight and see what I find
Post by: oldone on May 13, 2011, 10:53:29 am
Post by: jwrape on May 13, 2011, 11:28:29 am
jason that is one good looking fiero! is that grey? sometimes pictures on the computer will fool you when it comes to color. those are sharp wheels too. are you bringing it to the meeting?
Yes, it's grey. 1992 Ford Ranger RC, from the receipts. Someone must of hand painted the car. It looks good from 5' away. It was originally Red and Silver. There is some paint missing where the Quarter Panels are missing.
The wheels I got on Craigslist for the Fiero Sport in the garage. I like them a lot better on the GT.
I plan to be at the meeting tomorrow. I took off work to be there. :-)
Post by: jwrape on May 13, 2011, 12:02:38 pm
got any ideas?
Post by: TopNotch on May 13, 2011, 01:56:05 pm
If you don't believe me, get a toy electric motor, connect it to a battery, and while it's running, spray the commutator with WD-40. You'll hear it nearly double in speed.
Post by: jwrape on May 13, 2011, 02:18:44 pm
Spray the connectors with WD-40. Spray the socket, too. Install and remove the relay a few times, then install for good.
If you don't believe me, get a toy electric motor, connect it to a battery, and while it's running, spray the commutator with WD-40. You'll hear it nearly double in speed.
Worth a try. Will do.
Post by: Fierofool on May 13, 2011, 02:26:52 pm
A word about the black junk on the Fiero relays. It serves a good purpose in keeping foreign matter and water out of the connection. It is a di-electric compound. If you clean it out, be sure to fill the socket with more di-electric grease.
Post by: jwrape on May 14, 2011, 06:38:20 am
I used to install and service golf course pumping stations. The control cabinets were loaded with relays and connections. One of my steps was to clean all connections, including relay sockets. I used non-conductive Electric Contact Cleaner aerosol. You can get it at Advance Auto Parts. Comes in a red can. I used to spray 460V service connections without ever getting zapped.
A word about the black junk on the Fiero relays. It serves a good purpose in keeping foreign matter and water out of the connection. It is a di-electric compound. If you clean it out, be sure to fill the socket with more di-electric grease.
Good information there. You guys are full of info.
I guess I will see you guys are the meeting at 1pm.
Post by: jwrape on May 17, 2011, 06:41:12 am
On another note, I put the new Kick down cable on my transmission but seem to be missing the clip that connects it to the Throttle body. Don't know what it looks like but I know the cable has a lead ball on the end and no way to connect to the linkage.
AND one more thing. I replaced my relay for the cooling fan and that didn't change anything. I then grounded the coolant switch and both fans came on, so I replace the coolant switch BUT the A/C being on still doesn't turn on the fans. So now I am sure it will click on when it hits the 235 degrees as it should but I would like to figure out why the A/C won't turn on the fan. It runs so much cooler when the fans on high.
Post by: Fierofool on May 17, 2011, 07:29:16 am
The so-called idle screw actually isn't to set the idle. The idle is controlled by pre-programmed parameters in the ECM. The screw on top of the throttle body is to set the opening of the throttle plate at idle. I know some say they can adjust idle with that screw, but that's not what GM says it's for.
Check with Ashby at adfieros@aol.com. He deals with a lot of automatics and probably has the part you need for the kickdown cable.
I don't remember, but have you verified your AC relay behind the the air filter is good? The two relays there are for the fuel pump and AC. They're identical and interchangeable. It may also be that the climate control unit is bad. I have a spare you can use for testing.
When you pull the car into gear, does it bang or thump loudly and stall? If so, it may be that your TCC switch has failed. Looking down at the transmission from the drivers side, you can see a connector slightly to the front of the transmission. Unplug that connector. If the problem goes away, the switch has failed. It locks the torque converter into 4th gear at highway speeds. The car is driveable without it disconnected, but MPG goes down.
Edit: Just went over to Pennocks and found this. http://www.fiero.nl/forum/Forum2/HTML/116321.html
Post by: jwrape on May 17, 2011, 07:56:35 am
The IAC has to readjust itself after the power is disconnected from it. I have my manuals packed away in storage at the moment, but if you have a Haynes manual, it describes the process of resetting it. The measured distance is from the base where the gasket sits (gasket removed) to the tip of the pintle.
Yea, once I was measuring it I realized it was from the base gasket out to the tip. Measuring just the pin and spring didn't make any sense.
So you are saying I should let it run for a little bit and let it reset?
Quote
The so-called idle screw actually isn't to set the idle. The idle is controlled by pre-programmed parameters in the ECM. The screw on top of the throttle body is to set the opening of the throttle plate at idle. I know some say they can adjust idle with that screw, but that's not what GM says it's for.
Yes, that's what I figured as well, but I could see that the cap had been drilled out and I wanted to make sure it was not affecting the idle.
Quote
Check with Ashby at adfieros@aol.com. He deals with a lot of automatics and probably has the part you need for the kickdown cable.
Gonna email him, thanks
Quote
I don't remember, but have you verified your AC relay behind the the air filter is good? The two relays there are for the fuel pump and AC. They're identical and interchangeable. It may also be that the climate control unit is bad. I have a spare you can use for testing.
I haven't verified that relay. I will get on that next. I didn't think about that. It should be the one on the left right?
Quote
When you pull the car into gear, does it bang or thump loudly and stall? If so, it may be that your TCC switch has failed. Looking down at the transmission from the drivers side, you can see a connector slightly to the front of the transmission. Unplug that connector. If the problem goes away, the switch has failed. It locks the torque converter into 4th gear at highway speeds. The car is driveable without it disconnected, but MPG goes down.
Hmm, you might be on to something there. It does bump when I put it into gear, but I have always thought it was due to it idling at 1400-2000rpms, but I will disconnect it and see. I have not felt it drop into "4th" or Locked state before. So far I have gotten 24mpg on the hwy, but I am screaming at 70 mph at about 5000+rpms. I feel like I can blow up the car just driving down the highway
I am really mostly concerned about that idle. right now the lowest it will go is 2000 rpms. It came up after adjusting the IAC. I'm gonna take it back off and verify it's as closed to a inch and a 8th as possible. I am sure I measured it correctly but I would rather double check it.
And with it cutting off when I drop it into drive it makes it impossible to drive right now.
LOL, i kinda feel as if I should replace all the sensors and relays and just start there. :-)
Funny, I might be driving the Sport before I get the GT right.
Post by: jwrape on May 19, 2011, 07:34:51 am
I pulled the IAC out and measured it. It was set to a 1", so I wiggled it out to just over a 1 1/8", the idle settled a little but still around 1400 rpms. I tried exactly 1 1/8", but it didn't change the idle enough so I pulled it out further.
I checked the timing. I went to loosen the clamp bolt and found it was already REALLY loose. So I checked it and found it was about 10 degree or more off. I set the timing to 10Degrees and it is running smoother and not skipping like it was and it seems to be running over all better.
I also checked the TCC on the tranny since the car would stall when going into gear. I pulled off the plug and found the plug was metled on one corner but not enough to affect it so I started it up and it still stalled. I replugged it back in and then it stopped stalling and now when driving I can tell it is locking the torque converter. So I guess I had a bad connection on that TCC plug.
I still have a high idle but it shifts into gear without stalling and I have the Torque converter locking now so I am a little lower rpm when cruising. The car runs better but still not perfect until the idle problem goes down.
The Check engine still comes on after driving for about 10 minutes. I will have to check the codes while the car is running.
Post by: jwrape on May 19, 2011, 07:42:20 am
Post by: Fierofool on May 19, 2011, 08:20:40 am
When you set the timing, did you insert the jumper into the ALDL before starting it? If no, your timing isn't correct. Warm the car to running temp. Set the timing on the average of cylinders 1 and 4 for best results. When set, lock down the distributor, turn off the engine, remove the jumper from the ALDL, then restart. The ECM will take over and your timing mark may not show at 10*. Jumping the ALDL removes all sensor overrides from the operation.
If the SES light is still coming on after a short drive, it's still probably within the EGR system. A metal gasket won't make a good seal so that could be the problem. The EGR tube is a double ended thing, so it'd need to be blocked on the bottom of the manifold, too. If there's a hole in it, that could be causing fast idle.
When you check the codes, the car shouldn't be running. Again, with ignition off, insert the jumper into the ALDL, then turn the ignition on without starting and it will display your set codes. Turn the ignition off before removing the jumper. Starting the engine with the jumper in place will only give you rapid flashes of the SES light. You'll see that when you set the timing.
Post by: jwrape on May 19, 2011, 08:25:36 am
When you set the timing, did you insert the jumper into the ALDL before starting it? If no, your timing isn't correct. Warm the car to running temp. Set the timing on the average of cylinders 1 and 4 for best results. When set, lock down the distributor, turn off the engine, remove the jumper from the ALDL, then restart. The ECM will take over and your timing mark may not show at 10*. Jumping the ALDL removes all sensor overrides from the operation.
If the SES light is still coming on after a short drive, it's still probably within the EGR system. A metal gasket won't make a good seal so that could be the problem. The EGR tube is a double ended thing, so it'd need to be blocked on the bottom of the manifold, too. If there's a hole in it, that could be causing fast idle.
When you check the codes, the car shouldn't be running. Again, with ignition off, insert the jumper into the ALDL, then turn the ignition on without starting and it will display your set codes. Turn the ignition off before removing the jumper. Starting the engine with the jumper in place will only give you rapid flashes of the SES light. You'll see that when you set the timing.
Yes, I used a Jumper to set the timing. I watched that Youtube video of how to set the timing on the V6. :-)
I had originally thought you had to have the engine off, but then after setting the timing with it running I figured i could still get the codes, especially when the CEL comes on after it's running. But I will do it without the engine on . I assume the codes are stored even if the CEL isn't on at the time.
I will check the entire tube the next time I get to work on it. I drove it to work today and it ran good. Other than the idle it's doing good.
I haven't had a chance to check the A/C relay yet but the Temp Switch is working. :-)
Post by: jwrape on May 21, 2011, 08:07:18 am
Once I ground it, it works so i know the rest of the circuit is good.
Post by: Raydar on May 21, 2011, 06:55:16 pm
Better to use plumber's joing compound.
Also, there's a circuit trace on the top of the A/C control head that will burn through, causing the fan to not come on with the A/C. Once you look at it, it will be very apparent where the trace has burned. If you can solder, the trace can be replaced by a piece of wire.
Post by: jwrape on May 24, 2011, 06:08:30 am
When you replaced the fan switch did you use teflon tape on the threads. It will sometimes insulate the threads and stopt the ground connection from being made.
Better to use plumber's joing compound.
Also, there's a circuit trace on the top of the A/C control head that will burn through, causing the fan to not come on with the A/C. Once you look at it, it will be very apparent where the trace has burned. If you can solder, the trace can be replaced by a piece of wire.
OH!!!! I used tape. That's it I bet. I will fix that.
Trace? Where is it? A/C Control Head. Is that the control face in the dash?
Post by: jwrape on May 24, 2011, 06:36:06 am
I then wiped all the dash down with Armor-all and blacked my speaker vents to look new. Really helps liven up the interior when it's clean and black instead of purple. :-)

also got under the car for the first time. It doesn't look too bad at all. Has a SLOW leak out of the front seal. Drips just a little.
I received a new to me A/C compressor and was looking to install it and find that the bracket has been Cut and Broken off. It has the front one bolt hole but the rear is completely broken off and there is a cut mark from a grinder on it. Also the A/C lines are totally gone.
So I'm gonna need a Bracket and the A/C lines to put that back together.
I found these two plugs under the car, I assume they are both for the A/C compressor although one looks like a Fan switch pig tail.

And Last I found this on the back firewall to the trunk beside the coffee can. It has two vacuum lines missing from it. Don't know what it does but the electrical plug is connected but not vacuum lines. What is it???

Post by: Donster on May 24, 2011, 07:01:07 am
\D
Post by: jwrape on May 24, 2011, 07:03:20 am
Cruise Control?
\D
Is there supposed to be vacuum connected there? The Cruise works perfectly. Don't know what's supposed to be plugged up there.
Post by: jwrape on May 24, 2011, 09:22:47 am
Post by: Fierofool on May 24, 2011, 09:52:28 am
I have an AC bracket. I don't know if it's the one you need, or not. It's small enough to hold in my hand. Has 3 holes where it mounts to the engine, and one that would be a swivel, as it has a bolt passing through it. It's solid steel. The other is aluminum, has 3 holes to mount to the engine and a widely spaced area where the compressor fits. It's about 10-12 inches long. $10 for the steel one, $20 for the aluminum.
The climate control switch on the dash is the common no-work cause. The trace he's talking about is part of the printed circuit. I have 2 on hand. One without cable and one with. You would only need the one without cable. $15
Post by: jwrape on May 24, 2011, 09:56:38 am
The little electronic device at the juice can is the cruise dump servo. One of those nipples is a dead end. The top one with the little hooks had a little foam rubber filter over it. There are no lines hooked to that end. The other end is the one with the hose, and by your photo, I see it appears connected. Without this servo, the cruise won't work.
I have an AC bracket. I don't know if it's the one you need, or not. It's small enough to hold in my hand. Has 3 holes where it mounts to the engine, and one that would be a swivel, as it has a bolt passing through it. It's solid steel. The other is aluminum, has 3 holes to mount to the engine and a widely spaced area where the compressor fits. It's about 10-12 inches long. $10 for the steel one, $20 for the aluminum.
The climate control switch on the dash is the common no-work cause. The trace he's talking about is part of the printed circuit. I have 2 on hand. One without cable and one with. You would only need the one without cable. $15
Ok, I need the aluminum one. The part of the one that's in there now is aluminum. I will have to get with you on that. The trace I will check it out and see if I need it or not. I haven't pulled apart that part of the dash yet. I need to, to fix the vinyl around the console there anyways.
Thank you Charlie
Post by: Fierofool on May 24, 2011, 10:01:36 am
Just give me a call if you need anything. You can probably get the AC line from Lee or Ashby.
Post by: jwrape on May 24, 2011, 10:03:00 am
Pull out the control and there's a metal plate on the bottom, held on by 1 screw. Remove the plate and you can see the printed circuitry.
Just give me a call if you need anything. You can probably get the AC line from Lee or Ashby.
Ok, thanks, i will email Ashby now.
Post by: jwrape on May 25, 2011, 11:35:15 am

and my new cut down shifter. I think I removed 2" from the stalk. I love the new lower profile look. Now I have to make a Aluminum plate to cover where the boot went. The boot won't work there anymore because it's too bulky. I have some aluminum and will make a single slotted plated for the stalk to slide through

AS you may be able to tell I also cut off about 3/4" of the bottom of the shifter to fit properly. I plan to get a Corvette shift knob to give it more of a lower profile.
Post by: Fierofool on May 25, 2011, 01:02:18 pm
Post by: jwrape on May 25, 2011, 01:03:43 pm
I wouldn't put the Corvette shifter on it. It will slow the car and decrease it's curve handling ability. :D
Oh I never would have thought about it that way. LOL
Post by: jwrape on May 26, 2011, 07:06:06 am

The bottom was nasty. Looked like the dirty filter on a spent cigarette.
Question: Is it common to have the Exhaust Manifold bolts break? Are they soft or prone to break.
I found my exhaust leak is a broken mani bolt on the front of the engine. I can see it pretty clearly from undernieth and I am not looking forward to tapping and removing that old thing. The last time I tried to remove something rusty from a head it snapped the EZ out in it and I was stuck. EZ outs don't drill out.
Post by: Fierofool on May 26, 2011, 07:55:26 am
Broken manifold bolts aren't uncommon, but it usually happens when trying to remove the manifold. The common thing to break is the exhaust port on number 6 where it meets the manifold runner. I would almost bet that the manifold cracked and someone thought it was a loose bolt, tried to tighten it and broke it off.
I have a set of industrial easy outs that I told you about, before. Not the standard reverse twist drill type, but the problem is that the shaft is very short and won't reach the broken stud unless the whole manifold is removed.
Did you get everything you needed for the AC system?
Post by: jwrape on May 26, 2011, 08:01:35 am
Did you get everything you needed for the AC system?
No I haven't yet. Ashby has the lines. I have to get over to his house and I was going to get with you for that aluminum bracket. Can you PM me your phone # so I can call you when I can drive over to Auburn? It's most likely gonna be next week I will try to catch up with both of you to grab those parts from you.
My wife last night said, "When are you gonna get those parts for that thing? "
I took that as hurry up and get them, so she won't give me a hard time about spending the money. But it's ironic that my 05' G35 has a bad A/C Clutch at the same time I am trying to fix the GT as well.
A/C service is expensive and I have two cars out of A/C. I am sweating bullets driving home in either car. LOL!
Post by: Donster on May 26, 2011, 08:12:43 am
A/C service is expensive and I have two cars out of A/C. I am sweating bullets driving home in either car. LOL!
Tell me about it. Got 2 Fieros with no A/C and need at least one of them fixed before Tybee Island :(
\D
Post by: jwrape on May 26, 2011, 08:14:52 am
A/C service is expensive and I have two cars out of A/C. I am sweating bullets driving home in either car. LOL!
Tell me about it. Got 2 Fieros with no A/C and need at least one of them fixed before Tybee Island :(
\D
Yea, my 2m4 has a compressor and everything on it but it's been sitting since 06' and it hasn't had a belt on it in a while i assume it's leaked down. But it would be an easier fix than the GT but the 2m4 is not driveable yet. Almost
Post by: Fierofool on May 26, 2011, 09:10:46 am
Jason, if you want, I can drop the bracket off either at your house or I'm going to be in Ridgeland during the weekend, just across the street from your rental house, so I could bring the bracket with me.
Post by: jwrape on May 26, 2011, 09:22:06 am
Jason, if you want, I can drop the bracket off either at your house or I'm going to be in Ridgeland during the weekend, just across the street from your rental house, so I could bring the bracket with me.
Depending on what time, i could meet you in Ridgeland. I will be coming by there about 3:30pm on Friday and Saturday after work. Will you be there on either?
Post by: Fierofool on May 26, 2011, 10:01:26 am
Post by: Donster on May 26, 2011, 10:43:34 am
Don, the AC on the 85 isn't working? Check on the receiver/dryer to see that the cycle switch is plugged in. The AC always worked for me. If you'll get the 134a, I'll recharge it for you. I had a problem with the schrader valve leaking, so if it's leaked down, that may be the problem.
Yep, the 85
Don't really have a clue what you are referring to ??? but I might grab the manual and try and figure it out. Right now she's blowing nothing but hot air.
\D
Post by: Fierofool on May 26, 2011, 11:07:32 am
Post by: Donster on May 26, 2011, 11:59:38 am
Where's the best place to get 134a? And if I get it, does your offer stand to charge it?
\D
Post by: Fierofool on May 26, 2011, 12:59:47 pm
Post by: oldone on May 26, 2011, 06:29:16 pm
Post by: jwrape on May 27, 2011, 06:06:03 am
aerodonamic got 134a for about 8 dollars plus a can at dollar general about aweek or two ago.
Man....you can get everything there. That's crazy that they carry that
Post by: jwrape on May 27, 2011, 06:16:03 am
One second it will be zero, the next it's 40psi, the next it's 80 psi, the next it's over 80psi and the need jumps like it's walking on the sun.
The guy seems to think I did something wrong installing it. I simply unscrewed the old and screw in the newer one with a 14mm or 15mm wrench on the fitting of the sensor. I didn't use teflon tape so that it would ground properly. It's not leaking.
I don't know why it would jump around like it is.
Post by: jwrape on May 27, 2011, 06:54:24 am
It's probably useless. If you remove the connector and look to where it attached to the sensor you'll likely see a small hole at the bottom. GM made a mistake here and there is a plug that should go there or you can use a dab of high-temp RTV to seal it.
Water/condensation tends to get inside the sensor through that hole and damages the unit. That would cause the problem you describe. You can't fix it as far as I know.
I doubt that it had anything to do with your installation.
Sorry, I wish I had better info for you.
Ok, Thank you.
Post by: Fierofool on May 27, 2011, 09:16:57 am
As I said, that was years ago, but it seems that either there's still a lot of them out there, or they're still making them with a fault. I don't know how many BWD units I've returned to Advance and O'Reilly. The AutoZone brand is just as bad. Even AC/Delco has some bad ones, but that's where I got my last good one.
The only way I've found to be reasonably sure I have one that's reading correctly is to hook up a $10 mechanical oil pressure gauge and check the pressure when the engine is up to operating temperature. I think I bought my SunPro gauge at AutoZone. Once I know what the hot idle oil pressure is, then I have something to compare to when installing a new electric sending unit.
Post by: jwrape on May 27, 2011, 09:20:40 am
Post by: Fierofool on May 27, 2011, 10:17:12 am
Post by: jwrape on May 27, 2011, 10:33:52 am
Then I have one for you. Free. It registers close to 80 psi all the time. Came off the 86GT I sold Rat Pee 86. The mechanical gauge showed 15 psi.
Wow! Maybe I overstated. LOL! Um, don't care if it's totally accurate, maybe off by a few psi. LOL!
Thank you though.
Actually, my original sensor read over 80psi all the time. Looked like the motor was gonna blow a seal.
I'll break down and get a AC Delco. I'll just wait till after the A/C is fixed. I should have known better than to buy a used sensor anyway.
Post by: Fierofool on May 27, 2011, 11:39:38 am
Again, if you need to borrow a mechanical gauge, I have one.
Post by: jwrape on May 27, 2011, 11:46:15 am
Post by: Donster on May 30, 2011, 09:57:18 pm
I've been getting it at Advance on the club account. I heard that the price has recently gone up, wherever you get it. Get 1 can of 134 with stop leak and 2 regular 134's. The offer stands.
What would I ever do without Charlie's help?? Ice cold air blowing now, fun to drive -- Tybee Island here we come! ;D
Thanks Charlie!
\D
Post by: jwrape on June 01, 2011, 06:30:00 am
The next day it did the same thing.
It keeps doing that now. When i go to start it, sometimes it starts perfectly sometimes I have to keep trying it over and over.
Usually it starts perfectly.
I swapped out the relay for a known good relay. Still does it.
It's sounding like the fuel pump is going out.
I drove the Infiniti to work today and will be replacing the fuel pump soon.
Post by: Fierofool on June 01, 2011, 08:37:35 am
If you haven't gotten a spare ignition module to keep in the trunk, you should. It's a common failure point. Advance or AutoZone for under $40 with a lifetime warranty.
Post by: jwrape on June 01, 2011, 09:56:00 am
I do need to replace it to be certain though. I feel if I replace all the good stuff, it won't fail again for a while and I can have piece of mind about driving it long distances. I ALMOST drove it to Alabama over the weekend. I'm glad I didn't.
I have already ordered the fuel pump for $22. Same one I bought for the Sport a while ago. I will change the ignition module out first since it's easier and go from there. Thanks for the suggestion.
Post by: Donster on June 01, 2011, 11:54:43 am
But just in case, somebody here on the forum should confirm what I am babbling about ;D
\D
Post by: Fierofool on June 01, 2011, 12:00:54 pm
Edit to add what you already know. Go to NAPA and get the ethanol immersible hose to go inside the tank.
Post by: jwrape on June 01, 2011, 12:18:41 pm
Post by: jwrape on June 04, 2011, 06:31:13 am
(Thanks to Charlie for the brackets)
Here I mounted the Rear bracket onto my Reman'd Compressor and as you can see it doesn't quite line up for my aluminum mount to support the rear end of the compressor.


I wasn't about to give up there. I looked around in my bolt bins and found a piece of steel that I bent and vised till it fit perfectly to give the rear of the compressor support and not look to rigged. To me it almost look factory. :-) I don't know why it didn't line up originally, either there are multiple brackets made for the GT's (this one is from a 87' and mine is a 86') or the Reman'd compressor is a little different than factory. Either way it's fixed.


Edit: After looking at the pics, I am gonna replace the nut with a lock nut and cut off the excess bolt
Post by: jwrape on June 04, 2011, 06:31:40 am

Post by: TopNotch on June 04, 2011, 08:33:32 am
Post by: jwrape on June 04, 2011, 08:35:46 am
Two switches go in the back of the compressor where the plugs are. Or your your application, you only use one. In any case, you can get the switches at auto parts stores. I got some for the V5 compressor in my 88 duke at Advanced Auto. Look them up online first, and get the store's part no. It'll make it easier for the store personnel to find them.
Ok, cool. What does the little plug attach to on that harness with the high pressure plug? Looks like it slips onto a bolt.
Post by: Fierofool on June 05, 2011, 04:02:06 pm
Believe me, you want that high pressure switch in place. If the evaporator core gets plugged or the cycle switch fails, it can over-pressure. That is the weak spot. Better to have that pop out than blow unavailable parts elsewhere. I've had one blow on my 87 when the orifice tube plugged up.
Edit:
Here's the compressor that goes on there. It's turned the same as your first picture. Note the position of the front mounting ears at 3, 6, and 9 o'clock. By mounting the metal bracket you got from me, it will line up with the 9 o'clock ear on the front.
.JPG)
Post by: jwrape on June 07, 2011, 06:14:41 am
I should have it done on Wed.
I also have to remove the clutch from the AC compressor on my Infiniti to replace it. I have no idea what kinda of puller will get that off. I tried a pulley puller and it bent the pulley. NOT good. Luckily it's the broken pulley. But I have to take the old one off and the new one off the used Compressor I got. There must be a trick to it.
Post by: Fierofool on June 07, 2011, 07:49:08 am
Post by: jwrape on June 07, 2011, 07:55:13 am
The Fiero will prolly have AC before the Infiniti. I could replace the compressor myself on the Infiniti BUT I have nothing to store the Freon in so I will have to have them do it. One more expense ya know. :-)
My compressor I just got in the mail has 50k miles on it. It should be a good one.
Post by: jwrape on June 10, 2011, 06:17:25 am
Now I have to get the system vacuumed out and filled with 134a.

Post by: jwrape on June 10, 2011, 06:22:00 am
Post by: jwrape on June 10, 2011, 07:27:00 am
Post by: jwrape on June 11, 2011, 06:45:39 am
I got back out to the car from inside HD and the car wouldn't start. It would spin over and every once and a while would spark and try to start but never quite get it.
We checked the spark and it has spark. I checked the fuel rail and it had just a little bit of gas but mostly air from the purge valve on the fuel rail.
It seems that the fuel pump isn't working.
I switched the relays around. I had an extra in the trunk that was known to be good and I switched all 3 of them around to see if it changed things, nothing.
I am almost certain it's the fuel pump.
last week it didn't want to start or would studder a little on start up. Yesterday was it's final day. Luckily I have already order the fuel pump and have it sitting waiting on me to drop the tank.
Now I just have to get the Fiero the 5 miles home to change the pump out.
I figure I would rather change the pump out and have that out of the way anyway. Since I got the car I had wondered about that pump. The car has 92k miles on it but I am certain the pump has been changed at one point cause the wiring wasn't stuck back through the firewall hole, it was strung around it, there are new clamps on all the hoses and I have a FADED receipt for a new pump without a date on it. So it's newer than the car but who knows if it has the correct tubing on it or not. The tube in the tank could be mush like my Sport was. I kinda have a feeling it is.
I called Charlie and tried to figure it out but ran out of time since I was supposed to be getting dinner groceries for my wife.
I appreciate the help Charlie, and your nephew's help too.
I'll get it home and work it out.
Post by: Fierofool on June 11, 2011, 07:55:56 am
Post by: jwrape on June 11, 2011, 09:46:17 am
Here is a pic of the end I am talking about (not my lines)

Post by: TopNotch on June 11, 2011, 10:30:42 am
Post by: Fierofool on June 11, 2011, 10:46:05 am
Post by: jwrape on June 11, 2011, 12:50:24 pm
Post by: Fierofool on June 11, 2011, 06:16:14 pm
Post by: jwrape on June 14, 2011, 06:13:07 am
Usually those have the muffler attached and the flexible lines are crimped on. There is only one way you can put them onto the compressor when they're assembled. But with those being cut, I suppose you could attach the muffler and crimp the hoses onto either one. You would need to look at the Haynes Manual. I believe it has the exploded view showing the orientation and routing. The problem you're having with the filter might be due to having modified your mount to fit the compressor. You're welcome to come up and look at mine to see how they route.
I actually removed the rear mount because since the compressor mount is clocked different it cause issue using the rear mount. I also thing the clocking is what is putting the filter in the way.
I might have to use a oil filter relocation kit to get it connected right. I am needing just about a 1/2" to make it fit correctly.
Post by: jwrape on June 14, 2011, 09:36:17 am
I put the rear of the car up on ramps and sprayed it with Degreaser then pressure washed it.
Then I started her up and started to look for my exhaust leak. I am missing a bolt in the front manifold. I believe it's broke, BUT it's not leaking there.
I used my hand and followed the exhaust around and found that I have a HUGE leak on the rear manifold, the one that I CAN get to. Turns out the leak is right at the factory Clamped union. Weird location for it to be leaking. It definitely doesn't look like it's ever been taken apart there. It looks all stock. BUT I guess it has if it's leaking at the joint.
The problem is, getting the bolts loose. I have PB Blasted them, but I am SO afraid I will break the bolt.
It only needs to be re-set and tightened down again and I can get rid of that bad sound.
I will keep spraying the bolts and then try to loosen them. Fingers Crossed.
Post by: TopNotch on June 14, 2011, 12:16:43 pm
Whatever penetrant you use, after applying, tap the bolts to encourage it to penetrate. Repeat each half-hour for a day.
Post by: jwrape on June 14, 2011, 12:18:31 pm
Mix up a 50/50 mixture of acetone and automatic transmission fluid. Brush this mixture liberally on the manifold bolts. This mixture is supposed to be more effective than PB Blaster.
Whatever penetrant you use, after applying, tap the bolts to encourage it to penetrate. Repeat each half-hour for a day.
Hmmm, that sounds good. Thanks
Post by: jwrape on June 18, 2011, 10:24:31 am
http://fierosparks.com/links/1.html
It's a High Pressure Cut out switch :switch was a normally-closed one pin device that provided a ground by contact with the compressor body to complete the the A/C clutch circuit. That switch is now obsolete, replaced by a two-pin switch similar to the V5 HPCO switch shown below. This substitution requires installation of a new connector (included with the switch). The second wire is connected to ground.

So, don't know what to do about that one.
Post by: jwrape on June 21, 2011, 06:51:53 am

Post by: jwrape on June 24, 2011, 07:51:20 am
Charlie knows about my GT breaking down at Home Depot. Well I got the car home with a tow strap and a fun pull home about 2 miles.
Anyways, on Wed. night I spent replacing the Fuel pump and troubleshooting.
I dropped the tank and pulled the pump. I saw where the pump has been changed: New clamps on every hose, the wiring was loose and the wiring looms were removed on the pump wiring. I fixed the loose wires. Either way, I pulled the pump and it looked decent and I later found out it was still working properly, but the screen was about to fall apart so I feel it might have been a year or so before it would have been pulling up the screen material through the pump.
I also changed the filter and found a lot of rust inside it. So I replaced all that and the pump still wouldn't come on with the key.
So I hot wired the pump through the diagnostic plug. It worked and then I could start the car for a moment until the fuel ran out again.
Well, I pull up the wiring diagram and see that the org/blk wire connected to the tan wire should kick it on. I crossed it over at the relay and it worked. So I pulled the 3 relays off the Sport and checked all of them as well as the A/C relay beside the Fuel Pump relay. None of them made a difference.
SO I realize then that it has to not be getting signal to turn on from the ECM. I am starting to think I have a bad ECM. Then I go and search the Pennock site (Georgia Fiero Club was down) and finally found where someone posted about the oil pressure sensor being in the middle and would cut the fuel if the oil pressure was low. I checked the dip stick and found that I was low a quart(motor Leaks a little). I poured in a quart and the car started without issue.
I FEEL STUPID at this point . I have never had a car cut off because of a quart low. Only my lawn mower does that. The car is smarter than me... Cool option when you know about it.
I know now not to worry about the fuel pump. LOL! The other one had some rust spots on it and the screen was almost apart. It was still worth it for the piece of mind.
Post by: Fierofool on June 24, 2011, 02:17:49 pm
Guess I was wrong. Thanks for the education you've given us on this project. Glad you got it going.
Post by: jwrape on June 24, 2011, 02:26:04 pm
I always thought the pressure switch circuit was a backup to the main fuel pump circuit so that if the main circuit failed, the pump would continue to operate through the oil pressure switch. I've seen some Fieros with no oil pressure at idle and they would still run. That's the way my old 87 engine was before I made the swap. I used the same sending unit on my 3.4 and it seems to read normal, so I believe my readings were correct.
Guess I was wrong. Thanks for the education you've given us on this project. Glad you got it going.
Yea, someone on Pennock's said that it is a back up, but the way the wiring diagram is written, it looks like it goes through the sensor and that's it. I don't know but I kinda like it that way. Makes sure I don't run it dry.
It drips about a silver dollar on the ground after sitting for about 4 hours.
Post by: jwrape on June 28, 2011, 07:02:04 am
I checked the relays(checked with 5 different ones), I checked the fuse and all were good. So I replaced the Fuel pump. The old fuel pump ended up being good, but I replaced it anyways.
So after all that the car still wouldn't run unless I hotwired the FP on the diagnostic terminal in the console.
So I knew the pump worked and was connected properly. So I used a Wiring diagram I found and crossed the Org/blk wire to the tan wire and it worked at the relay. So I realized there was no signal from the ECM to tell the relay to come on. My wiring Diagram said that the power also ran through the Oil Pressure sensor so I checked the oil level and it was a quart low. I filled it up and it started immediately.
Ok... It's running. Yea, BUT I have found that the fan runs all the time now AND the car is VERY slow to start after sitting. Feels like the fuel pressure regulator is bleeding down after sitting. On the flip side, once it's started you can turn the car off and restart it just fine. It's only after it sits for over a hour or more.
It's been said (by Charlie and others) that the Oil Pressure sensor power is a secondary power source for the fuel pump and if it's running on that source then somethings wrong. Furthermore, it's been said that the Oil Pressure source is a lower power source than the primary and that would make sense why it's slow to start.
I think the ECM has a issue. I am wondering if me grounding the green and white wire on the ECM to switch the fan on and off, might have put extra strain on the EMC and burnt or broke the primary fuel pump circuit.
What do you guys think?
Post by: Fierofool on June 28, 2011, 08:43:39 am
Now, for the ECM, if you would like to swap out ECM's, I have 3 ECM's that you can swap in as a test.
As for the fuel pressure leak down, you can do a fundamental check just by removing the cap from the schrader valve on the fuel rail and seeing if you get a good strong squirt of fuel before starting the engine. You could also cycle the switch to the on position several times to fully pressurize the system. If you think the cold start injector is leaking down, I also have several fuel rails with cold start injectors.
Post by: jwrape on June 28, 2011, 08:52:56 am
I'm not too sure just how importantly the oil pressure circuit plays into everything. I've removed the sending unit and installed a mechanical unit and ran it for several days without any problems that I remember. When I was putting RatPee86 back on the road, that's the way I had it set up.
Now, for the ECM, if you would like to swap out ECM's, I have 3 ECM's that you can swap in as a test.
As for the fuel pressure leak down, you can do a fundamental check just by removing the cap from the schrader valve on the fuel rail and seeing if you get a good strong squirt of fuel before starting the engine. You could also cycle the switch to the on position several times to fully pressurize the system. If you think the cold start injector is leaking down, I also have several fuel rails with cold start injectors.
That's what I should do is put my pressure gauge on the rail and see what the fuel does as it sits. It theoretically should stay at the pressure it stops with. If it bleeds down then I know the pressure regulator is failing.
BUT on the other topic, I haven't tried it yet, but I suspect the car would die if I disconnected the pressure sensor. I will have to try it today. I drove the car to work sense my Infiniti is giving me headaches lately.
Post by: TopNotch on June 28, 2011, 10:59:12 am
I drove the car to work sense my Infiniti is giving me headaches lately.
I heard those things catch fire. ;)
Post by: jwrape on June 28, 2011, 11:17:00 am
Post by: jwrape on July 06, 2011, 06:48:04 am
It's not pretty but expected. The shaft was rusted through and the casing is a little worn out. I have to get another shaft but I MIGHT be able to fix the case with JB weld. But that is to be determined.
Yout tube video with my Country accent in it. LOL
http://youtu.be/VOfpt_uyOZg (http://youtu.be/VOfpt_uyOZg)
OH yea, both the brushes came off at some pioint. So I will try to re-soldier them back on. Argh!


Post by: Fierofool on July 06, 2011, 07:52:00 am
The lubricant that goes in the motor isn't available any longer. If you will get yourself a tube of Sil-Glyde Disk Brake Slider Lube, it will work great. It's high temp, doesn't melt, and protects the rubber seals on the motor. It's used on brake sliders. I once used the silicone grease I bought from Rodney Dickman and it melted and dripped out the bottom of the motor.
The extra shaft I have isn't the same as you need, but I do have several repaired and repairable motors.
Post by: jwrape on July 06, 2011, 07:57:36 am
In your 6th picture down is where all that green junk came from. They were original bump stops that were underneath that metal piece, held in place by the fingers. I've found some nylon pieces that I've used as replacements and I have also used pieces of Maple dowel inserted in there.Buddy Craig on youtube fills the gear with JB weld and does away with the nylon bushings. What do you think? Is that something that's ok to do. Does it put too much strain on the gears not to have the bushings in there.
The lubricant that goes in the motor isn't available any longer. If you will get yourself a tube of Sil-Glyde Disk Brake Slider Lube, it will work great. It's high temp, doesn't melt, and protects the rubber seals on the motor. It's used on brake sliders. I once used the silicone grease I bought from Rodney Dickman and it melted and dripped out the bottom of the motor.
The extra shaft I have isn't the same as you need, but I do have several repaired and repairable motors.
I'd like a repairable one since I have a lot of good parts in this one. I'll call you later to see if your gonna be around this afternoon after work. I have all the parts with me and can most likely stop by. Let me know what I owe you.
Thanks
Post by: Fierofool on July 06, 2011, 08:38:08 am
Aerodonamic may have a better idea. He cleans the plastic gear very well, then fills the cavities with RTV and reassembles it onto the shaft. I would think that for the best function in this manner is that you place the fingers of that plate into the RTV right in the center of the cavities so you have good cushion in both directions.
McNaughton-McKay has some products that I'm going to try on my next rebuild. Very similar to the original bump stops.
Post by: jwrape on July 06, 2011, 08:48:57 am
Post by: jwrape on July 07, 2011, 06:59:03 am


I found a half tooth missing on the gear, luckily my original motor has a perfect gear.
Ok, I got another motor to help rebuild a Driverside motor for my GT's Headlight. I took it apart last night and found it was in MUCH better condition on the inside of the case.
I found a half tooth missing on the gear, luckily my original motor has a perfect gear.
I will have to buy another gear for the driverside probably cause it probably has teeth missing since it keeps running when it goes up or down.


Post by: jwrape on July 14, 2011, 06:17:57 am
I hooked it up and it worked perfectly. I am so happy.
Now I moved on to the passenger side and like Charlie said, it was a stripped gear.
I'm ordering a new one as I type. I've got the rest of the motor alaready cleaned and put back together.
I am also working on my Slim down pop up headlight mod.
I have cut down my buckets and made my new brackets to fit my 4x6 headlights. I should have it together tonight. I will, of course, post pics here shortly.
I'm stoked to see the lower version lights pop up together. I haven't had the head lights working up/down since I got it.
Post by: Donster on July 14, 2011, 08:21:04 am
\D
Post by: jwrape on July 14, 2011, 08:28:03 am
Are you keeping the regular lights or ar you modding to HID?I am sticking with the regular lights right now. HIDs are expensive.
\D
Post by: Donster on July 14, 2011, 08:33:13 am
\D
Post by: jwrape on July 14, 2011, 08:38:24 am
True statement, they are expensive. I'm thinking about modding the 84 to flush-mount with duals and clear cover.
\D
I like those too.
I thought the bucket cut down would be semi-easier. I also like the updated look of them both
Post by: jwrape on July 15, 2011, 06:23:50 am
I fininshed cutting down the bucket frame and then after install I had to go back and mod the finishing panels on the side to fit better in it's new position.
I think it looks ten times better. I love the sleek look and the clean headlight lenses.
I took some pics of the Sport's headlight in comparison. I quickly realized that I forgot to wash the Sport's headlights and they are covered in Pollen, but you get the idea.


and the bad night pic

I am still waiting to get the passenger side motor together but the housing is cut down and the light is mounted ready to install,.
I love it.
Post by: jwrape on July 19, 2011, 06:41:21 am

I ended up using the chipped gear in the passengerside. I looked at it real hard and just figured, half a tooth missing shouldn't affect it and even if it does, I will just pull it and replace it. It's not a hard task. So far it works perfectly and I think it will serve me well.
I haven't pointed them yeet because the car stopped running again. It has a bug in the fuel system power that's driving me nuts.
Post by: Donster on July 19, 2011, 06:52:32 am
\D
Post by: jwrape on July 19, 2011, 06:54:44 am
Sux with the stalling, but hey, at least your head lights look good! ;D
\D
True!, Thanks
Post by: jwrape on July 21, 2011, 07:36:48 am
Well last night I started it with the Fuel pressure gauge on the rail and left it over night.
I will check and see if it holds by tonight.
It's down to 40psi after turning the car off.

We'll wait and see tonight....
Post by: jwrape on July 27, 2011, 01:02:35 pm
Post by: Donster on July 27, 2011, 01:10:12 pm
Ok,..... Tonight maybe I will be able to get my GT ready for August 6th at Whodenies. I got my fingers crossed. :-)
keeping 'em crossed 4 ya too ;D
\D
Post by: jwrape on July 27, 2011, 01:14:54 pm
Post by: jwrape on July 28, 2011, 07:36:36 am
I changed out the ICM. The car still didn't start. Ew that made me mad. I thought, O.K., the ECM is bad, let me change that out. I changed that out and as I did I found these pin holding clips laying below the ECM.

So basically the plug was connected but could have had a pin or more come loose.
So I plug in the new to me ECM and see on the large plug where the clips were off the Green and white wire not all the way in and prolly, MAYBE the reason why the fuel pump wasn't getting signal.

So I pushed in the ECM plug pin clips to make sure the pins are properly seated. I feel better thinking that was the inconsistant problem all along.
Well, I get the ECM installed correctly and check everything to be correct. Go to start the car and it doesn't start again. No Fuel Pressure still.
So I start thinking.......
My last ditch effort really..... I grab a extra grounding cable I have and attach it to one of the intake bolts and back to the negative of the battery. The car starts right up.
I think that was my problem all along. Bad Grounding somewhere or everywhere. Now I have perminantly installed a extra ground wire to the block.
I next moved on to replacing the Fuel Pressure regulator. I pulled off the top of the intake and found, what I had assumed, that the EGR tube was bad. The top part that attaches to the intake had already been welded VERY poorly and was leaking. I removed it and found that it was covered up with a Aluminum can piece at the intake. It wasn't working to begin with. Anyways I am fixing it with a 1/2" Natural Gas flex pipe. I cut off the ends that came with it and re-flanged them into the original EGR Tube ends. So far it looks and fits great. I won't know until I get done re-painting the intake and re-installing.
But here are the ends I made up.


Post by: Fierofool on July 28, 2011, 08:11:03 am
The EGR tube looks great. Is it heat proof or will it have the original insulation on it? It gets pretty hot, especially close to the EGR valve. Maybe you should think about making those things if they work out for you.
Post by: jwrape on July 28, 2011, 08:20:37 am
Wonderful news. I've heard it said many times, and I think the last one I heard say it was Raydar. You can never have enough grounds on a Fiero.
The EGR tube looks great. Is it heat proof or will it have the original insulation on it? It gets pretty hot, especially close to the EGR valve. Maybe you should think about making those things if they work out for you.
I'm gonna re-use the EGR tube isulation that came off the original but it should with stand the heat from what I have read. I got the idea from here, except the re-flangin. I did that one my own design.
http://60degreev6.com/forum/showthread.php/45766-EGR-tube-Fix (http://60degreev6.com/forum/showthread.php/45766-EGR-tube-Fix)
Post by: Fierofool on July 28, 2011, 08:33:00 am
Post by: jwrape on July 28, 2011, 08:52:30 am
I do love the highlands though.
Until my wife starts her new job I'll have to stick to the local shows and meetings. I definately want to go to the highlands again. I love that place. We went back in Feb. 2010 for Valentines and had a blast in the snow. That entire water fall on the road there was frozen.
Post by: jwrape on August 03, 2011, 06:54:15 am
Since the gaskets were on incorrectly from the PO I had to try it a couple different ways before I got it. Also my flanged end on the intake side needed a little more flange to it to make it work correctly.
At first when I started the car it idled up to 3000 rpms. I was not happy and played with the timing and checked the tube and anything else and then eventually, after it had already warmed up, I guess the ECM figured out the change that had been made and idled down perfectly for the first time since I've had the car. I love it. It idles good now.
I washed the car, put a plug in the leaky tire that had a nail in it and cleaned the coffee off the passenger seat from months ago. I put the tire slick on the tires and now it's sitting ready to roll out on Saturday to Whodeanies.
Post by: Donster on August 03, 2011, 08:23:40 am
\D
Post by: jwrape on August 03, 2011, 08:26:47 am
The ol' GT is coming along, one Fix or Mod at a time. :-)
Post by: Donster on August 03, 2011, 08:34:47 am
Thanks, me too. You gotta check out the headlights and the EGR tube that I home Engineered. LOL! They all turned out pretty well and work great.
The ol' GT is coming along, one Fix or Mod at a time. :-)
Yep, I especially can't wait to see your lights mod , since I want to do a mod on the 84 also. But your ingenious EGR mod might come in handy in the future also ;D
\D
Post by: jwrape on August 03, 2011, 08:43:59 am
Thanks, me too. You gotta check out the headlights and the EGR tube that I home Engineered. LOL! They all turned out pretty well and work great.
The ol' GT is coming along, one Fix or Mod at a time. :-)
Yep, I especially can't wait to see your lights mod , since I want to do a mod on the 84 also. But your ingenious EGR mod might come in handy in the future also ;D
\D
ingenious, well it wasn't my idea really. I got it from another link here. Gotta give credit.
http://60degreev6.com/forum/showthread.php/45766-EGR-tube-Fix (http://60degreev6.com/forum/showthread.php/45766-EGR-tube-Fix)
It's not exactly the same EGR tube nor the same way attached it but where there's a will there's a way.
I love home engineering as long as I can make it look nice and not rigged.
The only thing I can complain about it how long the tube is now. It's a 24" tube. I really needed a 12" or maybe 10" tube but it wasn't available.
If I find a shorter one I might replace it eventually. But for now it gets the EGR functioning as to before when both ends were closed off.
I had closed the EGR valve side off and then when I took the intake off, I found that someone had tried to soldier the pipe before and then closed it off after it failed again. So the EGR was totally cut off and idling at 2k rpms. Now it idles around 1200 rpms, which is GOOD with me. I think my timing needs to be adjusted a little but it runs really good now and starts up like a new car.
Post by: Donster on August 03, 2011, 09:05:53 am
But I'm sure you already know if that needs to be done or not.
\D
Post by: jwrape on August 03, 2011, 09:08:55 am
If timing adjustment on the 2.8 is like timing adjustment on the 2.5, don't forget to short the two pins on the ADLC before adjusting.
But I'm sure you already know if that needs to be done or not.
\D
Yea, I've done it before, but I was messing with it and mis-adjusteded it due to a leaky EGR Tube.
Post by: jwrape on August 04, 2011, 09:01:56 am
So the flanging of the ends didn't work well enough so next step will be to pull it back off and Braze it with MAP gas and soldier.
After that is done it should work perfectly. Right now it's a lot better and actually seems to have smoothed the idle. It idles at 1400rpms right now but is running good.
Post by: Donster on August 04, 2011, 10:55:51 am
\D
Post by: jwrape on August 04, 2011, 10:57:41 am
Still a bit high on the RPMs, but once the EGR issue is corrected, plus the compensation from the EMC, it should drop to the correct idle
\D
That was my thought aswell
Post by: jwrape on August 23, 2011, 08:18:35 am
Wonder what that is.
Post by: Donster on August 23, 2011, 09:19:00 am
Replaced the MAP and it improved
\D
Post by: jwrape on August 23, 2011, 09:21:35 am
Had the same issue on the 85GT
Replaced the MAP and it improved
\D
Improved? as in didn't completly fix it? The MAP sensor is one of the last that I haven't replaced yet.
Post by: Donster on August 23, 2011, 09:44:26 am
If you need one, I've got a spare, just for testing
\D
Post by: jwrape on August 23, 2011, 09:47:52 am
In my case, it could only improve (although drastically improved), as I also still have an issue with my throttle.
If you need one, I've got a spare, just for testing
\D
I appreciate it, but since this is the last sensor I have left, I want to buy a new one and just replace it. I'll just grab one. Then I will have replaced all the sensors with new and they SHOULD be good for a while. LOL!
Post by: jwrape on September 28, 2011, 07:56:35 am
I sanded with 800, the sprayed them with VHT NiteShades, then wet sanded with 1000 then spray MANY coats of clear until I ran out and then wet sanded with 2000 and compounded them out.


Post by: jwrape on September 29, 2011, 12:43:23 pm
What-in-tha-world.
Anyone know what's wrong with it?
Never worked on a seat belt. Kinda scared I might ruin my safety. I feel naked without wearing it. Not to mention the threat of a ticket.
Post by: Donster on September 29, 2011, 12:48:06 pm
If yours is shot, let me know, I have a couple of spare driver's belts, but they are light grey, I assume yours is the dark grey, being an 86
\D
Post by: jwrape on September 29, 2011, 12:53:39 pm
Let me know what you want for it. You live in Buford right?
Post by: Donster on September 29, 2011, 02:52:55 pm
Let me know what you want for it. You live in Buford right?
Nothing and yes ;D
Post by: jwrape on September 30, 2011, 06:58:21 am
Post by: jwrape on October 01, 2011, 11:14:12 am
It was shifting around 5k rpm's and now it shifts nicely at 4k rpms.
Post by: jwrape on October 04, 2011, 07:01:20 am
Sunday, I lowered the rear end. Cut a coil off. Monday I cut a coil and half off the front. Monday afternoon I had it aligned. OMG! How much better this thing drives with a Laser alignment. The mechanic said ALL the bolts took breaker bars to get loose and were still hard to move.
Such a differnce. MUCH easier to drive now.
Here it is lowered now


Here you can see a previous pic with the wheel gap
Also now that the rear is lowered the rear wheels are flush with the fenders. Before they sat in. The A-Arms extended the wheels out perfectly.
Post by: Fierofool on October 04, 2011, 10:12:49 am
Post by: jwrape on October 04, 2011, 10:24:41 am
Looking Good! Will you be joining us for the Charity Car Show in Canton, Saturday, then down to the Galaxy for the meeting?
No, not this time either. I am still battling bills and really have nothing extra. Trying to save absolutely everything until I get back leveled out. I'll make another soon, just have to balance everything
Post by: jwrape on October 05, 2011, 06:47:49 am
Post by: jwrape on October 11, 2011, 08:44:48 am
Got it aligned the other day and it made it MUCH more of a joy to drive
Here is the night I took my daughter out to the movies and Chinese.

Post by: jwrape on November 09, 2011, 07:08:33 am
Post by: jwrape on December 12, 2011, 09:59:43 am
http://youtu.be/iKWEJu-UkAY (http://youtu.be/iKWEJu-UkAY)
I am working on a hood as well but haven't gotten too far with it yet. I am trying for perfection on the hood and Deck lid, at least, due to that is where you look first when looking at the car. It takes time and patience, patience I do not have. LOL! But it will get there eventually.
Post by: Donster on December 12, 2011, 10:15:21 am
Did you use the Rustoleum Black Metalic like I used? That's what it looked like.
Told you it would turn out good ;D
\D
Post by: jwrape on December 13, 2011, 06:12:40 am
Post by: jwrape on December 13, 2011, 09:34:32 am
Here is what I started with.

The fender only had two little chips on it to fill and a little wet sanding and it was ready to spray.


Then I have spot puddied and sanded the hood. Just starting to paint it. Trying to get it perfect.


Post by: Tha Driver on December 13, 2011, 10:19:12 am
~ Paul
aka "Tha Driver"
Custom Fiberglass Parts (http://angelonearth.net/customfiberglass/)
Post by: jwrape on December 13, 2011, 11:35:56 am
I hope you're using an air dry putty on it. It will never look right if that's the case. See my thread on the right products to use. http://gafieroclub.org/bbs/index.php?topic=469.0
~ Paul
aka "Tha Driver"
Custom Fiberglass Parts (http://angelonearth.net/customfiberglass/)
Not sure what you mean? "Air Dry Putty". Is that it's name? It is spot putty that does air dry. There is very little in it at all. Most of it was sanded off.
Post by: jwrape on December 13, 2011, 11:42:00 am
Post by: Donster on December 13, 2011, 12:46:31 pm
\D
Post by: jwrape on December 13, 2011, 01:07:19 pm
Have you tried disconnecting the battery to clear out all codes in the ECM?
\D
No, I didn't. Hmm, didn't think it would re-occur since it clears every time I turn off the car but I will clear it just to make sure.
Post by: Tha Driver on December 13, 2011, 02:32:38 pm
(I left out the word "not". I edited both copies to add it.)I hope you're not using an air dry putty on it. It will never look right if that's the case. See my thread on the right products to use. http://gafieroclub.org/bbs/index.php?topic=469.0
~ Paul
aka "Tha Driver"
Custom Fiberglass Parts (http://angelonearth.net/customfiberglass/)
Not sure what you mean? "Air Dry Putty". Is that it's name? It is spot putty that does air dry. There is very little in it at all. Most of it was sanded off.
The air dry putty will shrink or swell as you paint over it. It was OK to use with lacquer primer 40 years ago, but only then in such thin scratches/areas the primer would have covered it anyway without any putty (with blocking). Check out the link I posted above for the right shtuff to use.
~ Paul
aka "Tha Driver"
Custom Fiberglass Parts (http://angelonearth.net/customfiberglass/)
Post by: Fierofool on December 13, 2011, 03:59:46 pm
Test the EGR valve by disconnecting the vacuum line, then from underneath, press upward on the diaphragm. Plug the vacuum port with your finger and while still touching the diaphragm, release the pressure. If it moves downward, you have a hole in it. That indicates a leak in the system, just like a broken tube.
If that isn't the solution, then you have a problem with the EGR solenoid. I have several you can test fit to see if that is the solution.
Post by: jwrape on December 13, 2011, 09:21:47 pm
If the check engine light comes on each time you drive it at highway speeds, it's EGR related. Every time it comes on means a new event has occurred, not because a code was already stored. Usually you need to get up to road speed for it to light up. Clearing the code won't make it go away. There are still problems with the emissions system.
Test the EGR valve by disconnecting the vacuum line, then from underneath, press upward on the diaphragm. Plug the vacuum port with your finger and while still touching the diaphragm, release the pressure. If it moves downward, you have a hole in it. That indicates a leak in the system, just like a broken tube.
If that isn't the solution, then you have a problem with the EGR solenoid. I have several you can test fit to see if that is the solution.
Post by: jwrape on January 03, 2012, 10:10:42 am

So I went ahead and made a shifter plate out of Plexiglass

And installed the white gauge kit my wife bought me for Christmas


I have the A/C controls White face coming in the mail to complete the look...
I built this plate after my Dremel drill gave out. I want to rebuild it to look more professional but it looks pretty good now
Post by: Donster on January 03, 2012, 11:34:27 am
\D
Post by: jwrape on January 03, 2012, 01:10:09 pm
Where did you get the complete white face plates for the 120 cluster, aux and HVAC?
\D
http://www.whitegauges.net/categories/Pontiac/Fiero/ (http://www.whitegauges.net/categories/Pontiac/Fiero/)
Post by: jwrape on January 10, 2012, 07:10:09 am
I have the hood and the driverside fender done.
The past couple days I have been working on the Deck Lid and I painted the passenger side headlight cover to see how it would turn out.
So far it looks great.
I am waiting for the fiberglass and then Putty to dry to fill the spoiler holes. I plan to re-install the wing but at a further back position.


I am also considering figuring out a Duck bill spoiler instead. But I am not sure at this time which I will choose.
THe Light lid turned out BEAUTIFUL


I have also started working on fiberglassing for the first time EVER. I am attempting to mount Trans Am Heat Extractor gills into my side lower quarters. So far it's going well. I will see when I start removing extra Fiber glass and adding filler to make them look right. Fiberglass is a strange animal.


Post by: jwrape on January 10, 2012, 07:13:06 am
Post by: Tha Driver on January 10, 2012, 03:38:20 pm
I would never fiberglass on the plastic 1/4 panels. And never ever put any kind of filler or 'glass over paint or primer. Are the T/A vents plastic too? If so you might get away with an adhesive designed for the RRIM 1/4s.
Have you seen this? http://gafieroclub.org/bbs/index.php?topic=469.0 Also there are lots of threads I've posted in on PFF on how to fill the decklid holes & other fiberglass/body questions. You can do a search with my username to find them.
You're welcome to come by & use my shop & tools & I'll help you decide on the best way to go about what you're doing.
~ Paul
aka "Tha Driver"
Custom Fiberglass Parts (http://angelonearth.net/customfiberglass/)
Post by: jwrape on January 11, 2012, 06:48:06 am
I hate to tell you this but you're going about most everything all wrong. That red putty is air dry, right? Get rid of it. Did you use 'Vette panel adhesive/filler with some 'glass mixed in to fill the holes?
I would never fiberglass on the plastic 1/4 panels. And never ever put any kind of filler or 'glass over paint or primer. Are the T/A vents plastic too? If so you might get away with an adhesive designed for the RRIM 1/4s.
Have you seen this? http://gafieroclub.org/bbs/index.php?topic=469.0 Also there are lots of threads I've posted in on PFF on how to fill the decklid holes & other fiberglass/body questions. You can do a search with my username to find them.
You're welcome to come by & use my shop & tools & I'll help you decide on the best way to go about what you're doing.
~ Paul
aka "Tha Driver"
Custom Fiberglass Parts (http://angelonearth.net/customfiberglass/)
Yea, I just figered out that the Fiberglass on the TA Vents isn't gonna work. It's not holding.
The Holes on the Deck Lid is fiberglassed under the putty. The putty was to even out the uneven surface. There is very little putty left after sanding.
THe holes turned out well and you can't really even see that they were ever there. The Fiberglass in the holes should work perfectly.
I will definately grab some Corvette filler for future and re-start.
The T/A vents are fiberglass or something similar, not plastic.
It is my first Fiberglass experience but I am learning. Thanks for the information.
Post by: Tha Driver on January 12, 2012, 03:44:47 am
The problem with fiberglass on the SMC (I assume you used polyester resin) is that it doesn't stick as well as the 'Vette shtuff. The putty, even if used very sparingly, will shrink or swell when painted over, ruining all your hard work.I hate to tell you this but you're going about most everything all wrong. That red putty is air dry, right? Get rid of it. Did you use 'Vette panel adhesive/filler with some 'glass mixed in to fill the holes?
I would never fiberglass on the plastic 1/4 panels. And never ever put any kind of filler or 'glass over paint or primer. Are the T/A vents plastic too? If so you might get away with an adhesive designed for the RRIM 1/4s.
Have you seen this? http://gafieroclub.org/bbs/index.php?topic=469.0 Also there are lots of threads I've posted in on PFF on how to fill the decklid holes & other fiberglass/body questions. You can do a search with my username to find them.
You're welcome to come by & use my shop & tools & I'll help you decide on the best way to go about what you're doing.
~ Paul
aka "Tha Driver"
Custom Fiberglass Parts (http://angelonearth.net/customfiberglass/)
Yea, I just figered out that the Fiberglass on the TA Vents isn't gonna work. It's not holding.
The Holes on the Deck Lid is fiberglassed under the putty. The putty was to even out the uneven surface. There is very little putty left after sanding.
THe holes turned out well and you can't really even see that they were ever there. The Fiberglass in the holes should work perfectly.
I will definately grab some Corvette filler for future and re-start.
The T/A vents are fiberglass or something similar, not plastic.
It is my first Fiberglass experience but I am learning. Thanks for the information.
If you have questions just ask. The link I posted above has all the right materials for the different parts on the Fiero.
~ Paul
aka "Tha Driver"
Custom Fiberglass Parts (http://angelonearth.net/customfiberglass/)
Post by: jwrape on January 12, 2012, 06:43:06 am
Post by: jwrape on January 12, 2012, 02:23:24 pm
I need more storage and a place to set little things. This should help.


I had been looking around for one and finally saw this one on eBay.
Post by: Donster on January 12, 2012, 02:42:37 pm
Very practical
\D
Post by: jwrape on January 13, 2012, 06:07:15 am
I've seen them in "OldOne"'s Fiero and have speculated getting one from TFS, they carry them also, for around $20
Very practical
\D
Oh, didn't know they were there. Well at least I didn't over pay. LOL. I figured $17.50 was a decent price. ;D
Post by: jwrape on January 13, 2012, 07:04:50 am


Post by: Tha Driver on January 13, 2012, 04:56:41 pm
Really you shouldn't be using single stage at all (if you are). Base/clear is not that expensive (for decent quality Dupont Nason if you're on a tight budget) & it provides UV protection to avoid fading & color breakdown.
~ Paul
aka "Tha Driver"
Custom Fiberglass Parts (http://angelonearth.net/customfiberglass/)
Post by: jwrape on January 14, 2012, 06:12:19 am
What kind of paint are you using? You shouldn't have to sand between coats - unless you're using single stage metallic which is hard to sand & buff without screwing up the metallic.
Really you shouldn't be using single stage at all (if you are). Base/clear is not that expensive (for decent quality Dupont Nason if you're on a tight budget) & it provides UV protection to avoid fading & color breakdown.
~ Paul
aka "Tha Driver"
Custom Fiberglass Parts (http://angelonearth.net/customfiberglass/)
I do sand in between, but it's Rustoleum.
Post by: jwrape on January 18, 2012, 06:51:24 am
Post by: Fierofool on January 18, 2012, 07:13:11 pm
Post by: jwrape on January 19, 2012, 07:21:30 am
Did you leave the standard bulbs and just change out the flasher unit? What are the benefits and effect of doing this?
I couldn't get my flasher to work correctly, especially at idle.
I had read on Pennocks in the archive folders somewhere that if you change out the Flasher with the EL12 Electronic Flasher it will flash correctly whether you have the correct resistance from the bubls or not.
A lot of folks switch out to the electronic Flasher so they can run LED lights. SInce the LED's provide less resistance, the OEM flasher won't flash correctly or at all. This corrects the problem with our OLD connection and/or grounding issues in our cars.
I recommend it for all Fiero's. Flashes perfectly with out the Breath Holding waiting on the OEM Flasher. LOL
Post by: Fierofool on January 19, 2012, 07:46:23 am
Post by: jwrape on January 19, 2012, 07:49:51 am
I don't have a problem with any of my flashers, but did you also change out the bulbs for LED or did you retain the original bulbs all the way around?
When I first got it, I replaced all the bad bulbs with incondescent lights to see if it would flash properly. It didn't, so then I started converting my blinkers to LED's. It still flashed the same (inconsistant).
Now with the EL12, it works correctly.
Post by: jwrape on January 19, 2012, 07:50:14 am
Post by: Tha Driver on January 19, 2012, 03:20:11 pm
Awful lot of work to do to paint a car just to use cheap paint that's not going to last on it. Keep in mind if/when you decide to paint it with quality paint you'll have to strip ALL of that Rustoleum off...What kind of paint are you using? You shouldn't have to sand between coats - unless you're using single stage metallic which is hard to sand & buff without screwing up the metallic.
Really you shouldn't be using single stage at all (if you are). Base/clear is not that expensive (for decent quality Dupont Nason if you're on a tight budget) & it provides UV protection to avoid fading & color breakdown.
~ Paul
aka "Tha Driver"
Custom Fiberglass Parts (http://angelonearth.net/customfiberglass/)
I do sand in between, but it's Rustoleum.
~ Paul
aka "Tha Driver"
Custom Fiberglass Parts (http://angelonearth.net/customfiberglass/)
Post by: jwrape on January 20, 2012, 06:07:06 am
Awful lot of work to do to paint a car just to use cheap paint that's not going to last on it. Keep in mind if/when you decide to paint it with quality paint you'll have to strip ALL of that Rustoleum off...What kind of paint are you using? You shouldn't have to sand between coats - unless you're using single stage metallic which is hard to sand & buff without screwing up the metallic.
Really you shouldn't be using single stage at all (if you are). Base/clear is not that expensive (for decent quality Dupont Nason if you're on a tight budget) & it provides UV protection to avoid fading & color breakdown.
~ Paul
aka "Tha Driver"
Custom Fiberglass Parts (http://angelonearth.net/customfiberglass/)
I do sand in between, but it's Rustoleum.
~ Paul
aka "Tha Driver"
Custom Fiberglass Parts (http://angelonearth.net/customfiberglass/)
That's just it, I don't want to spend $3000 on a paint job that is going on a $1500 car.
Stripping the paint isn't that hard anyways. I've done it 4 times now on the hood. LOL! Trying to get it as perfect as possible. :-)
Post by: jwrape on January 20, 2012, 08:13:33 am
So I soaked the plugs in PB blaster for 24 hrs before. I started on the plugs closest to the trunk. They seemed to be a little stuck, basically I tried loosening the plugs and had to put some effort into it and all 3 popped at first and then loosened up. No problems. The farthest plugs, closest to the firewall, were strange to me. I put the socket on and turned loosened the #6 plug. It felt like it was barely tightened. Turns out, it was barely tightened. In fact, all 3 were hand tight. Not even any effort to unscrew them. If I could get my hand down there I prolly could have loosened them by hand.
Crazy! But I got them changed and it's running smoother and a little more UMMF! when I get on it.
The old plugs were worn on the diode but were running a nice light brown color. Motor seems to be running well at 96k miles.
Post by: Tha Driver on January 20, 2012, 04:41:20 pm
The thing is, you're doing all the work of a $3000 paintjob (apparently more than once ;) ). Spend the extra $500 (if you can - I understand if you just don't have the money) & make the $1500 car worth a lot more. With Rustoleum, you're actually de-valuing the car for anyone that knows & wants to do it right.
That's just it, I don't want to spend $3000 on a paint job that is going on a $1500 car.
Stripping the paint isn't that hard anyways. I've done it 4 times now on the hood. LOL! Trying to get it as perfect as possible. :-)
You can get "wax & grease remover" at any autobody supply. Don't use anything else to clean it before painting.
~ Paul
aka "Tha Driver"
Custom Fiberglass Parts (http://angelonearth.net/customfiberglass/)
Post by: jwrape on January 21, 2012, 05:59:51 am
The thing is, you're doing all the work of a $3000 paintjob (apparently more than once ;) ). Spend the extra $500 (if you can - I understand if you just don't have the money) & make the $1500 car worth a lot more. With Rustoleum, you're actually de-valuing the car for anyone that knows & wants to do it right.
That's just it, I don't want to spend $3000 on a paint job that is going on a $1500 car.
Stripping the paint isn't that hard anyways. I've done it 4 times now on the hood. LOL! Trying to get it as perfect as possible. :-)
You can get "wax & grease remover" at any autobody supply. Don't use anything else to clean it before painting.
~ Paul
aka "Tha Driver"
Custom Fiberglass Parts (http://angelonearth.net/customfiberglass/)
I hear you. I just don't have the money to throw at it. It's a hobby car and I have approx. $8000 medical bills every year from my brain surgery and the proceeding scans every 2 months. I am doing good to have any extra money to play with my plastic car.LOL Also the car is so easily changed. The panels are so easy to change out, if I want to put a better paint on it I can easily change out the panels for different ones and start over.. I like the work on the body and paint. I like the good feeling when it turns out the way I want it to. I like the restoration process and appreciate my work that I put into it to get it right. Little imperfections BUG me so I work on it until it's right(in my eyes). I love doing something cool with little money or little changes that make people go WOW!
My other cars I have painted the correct way. My Father in-law and mother in-law run a Classic Collision and I have my G35 parts painted there for hardly nothing. Mainly just paint costs, but this little project isn't worth the trade out to get it completely painted, especially to take the car apart and paint EVERY piece seperately so none of the previous color shows. The Body shop would charge me at least a grand and then my jambs and nukes and crannies wouldn't be painted and I would hate it for that.
My way I change the entire car color and it's done my way. It works out good for me.
Post by: Tha Driver on January 21, 2012, 07:57:24 am
~ Paul
aka "Tha Driver"
Custom Fiberglass Parts (http://angelonearth.net/customfiberglass/)
Post by: jwrape on January 21, 2012, 08:10:09 am
OK that's cool. Personally I'd paint the jap crap with the rustoleum & the Fiero with good paint, but that's just me. ;D
~ Paul
aka "Tha Driver"
Custom Fiberglass Parts (http://angelonearth.net/customfiberglass/)
I have my other baby that gets the good paint. It's Jap Crap but I love it.
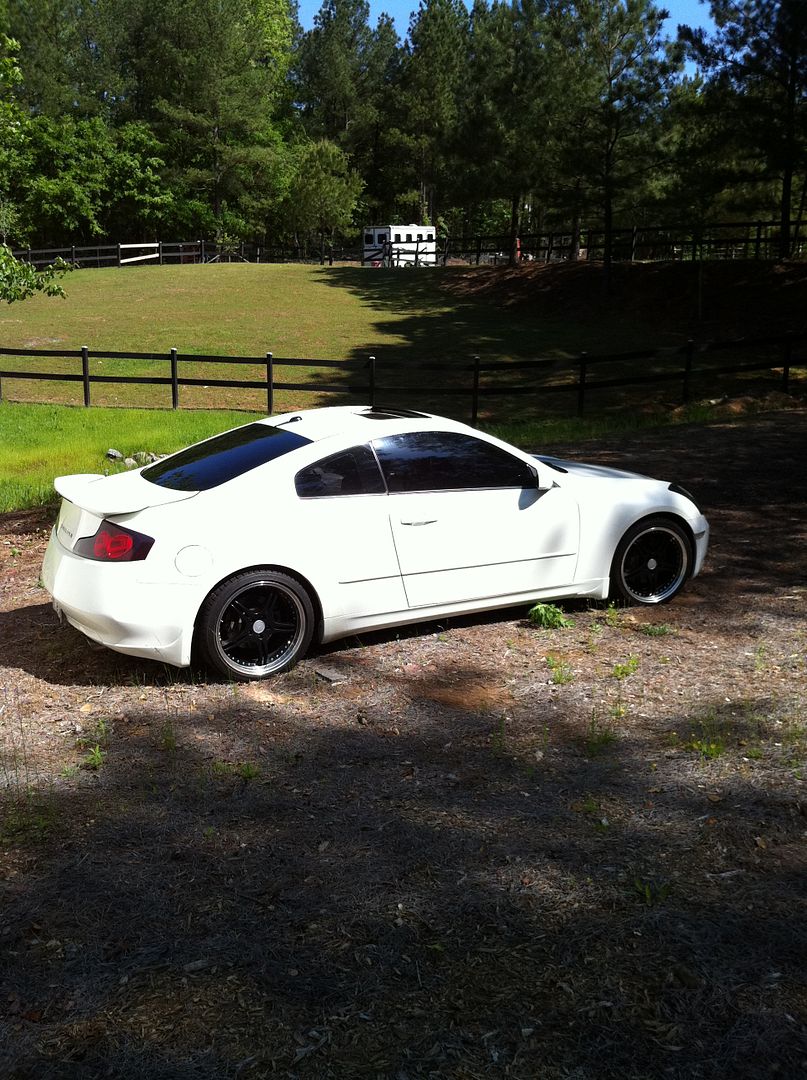
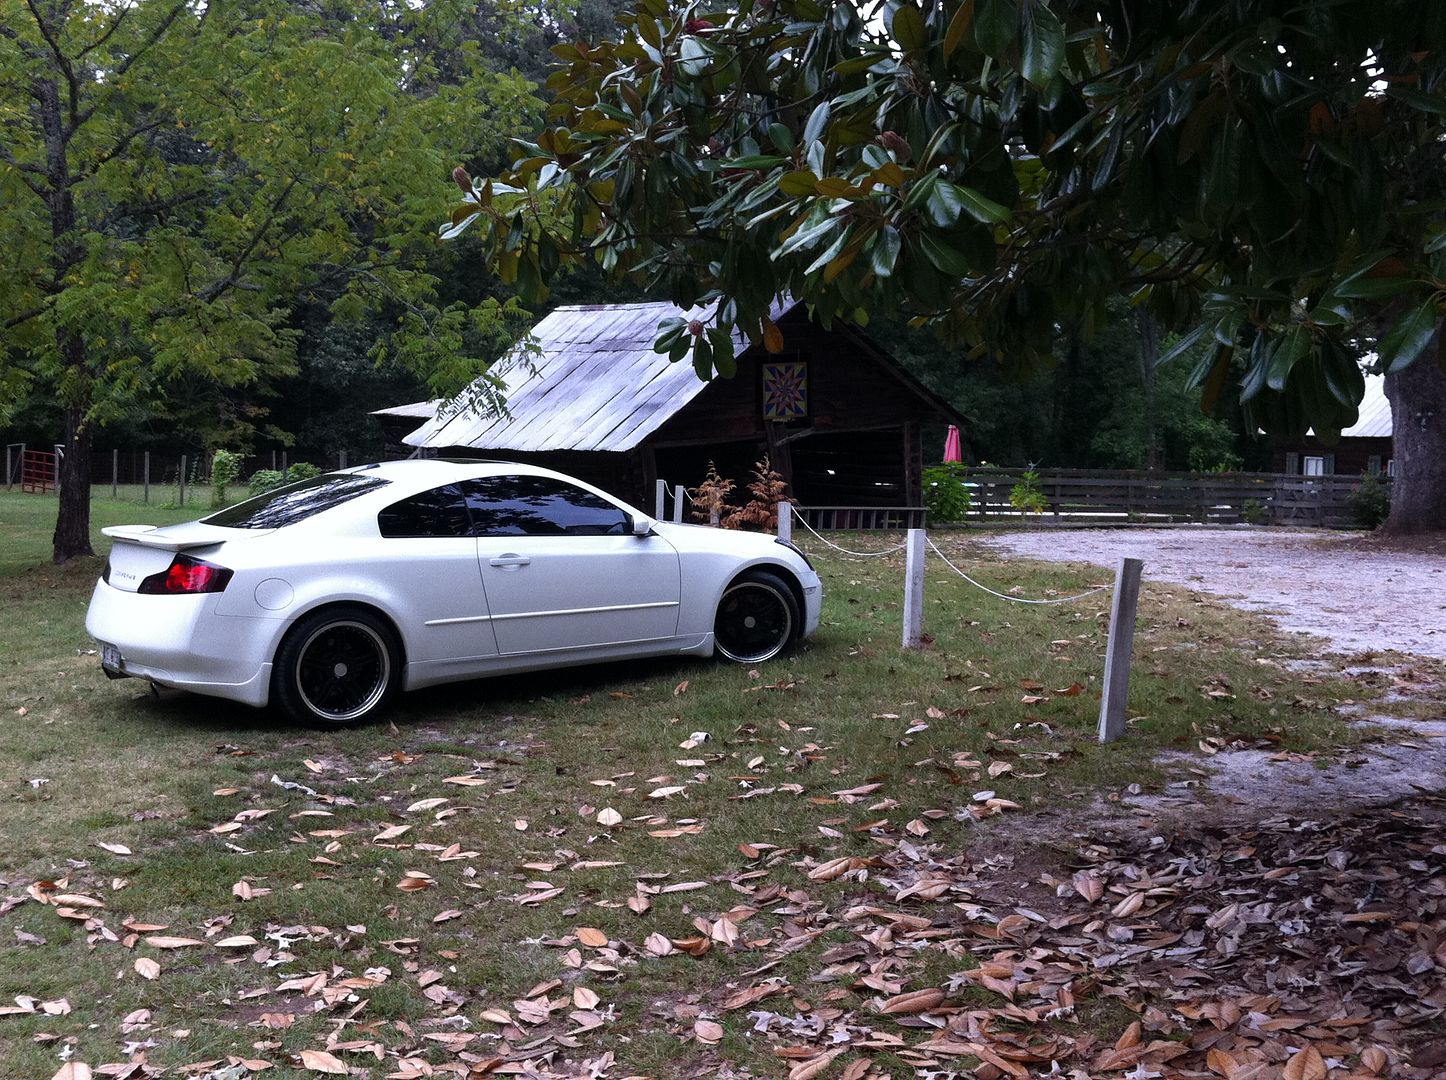
and the two babies together

Post by: Donster on January 21, 2012, 08:58:14 am
\D
Post by: jwrape on January 21, 2012, 10:22:38 am
Hey! I know that white car! My tinted tail lights have been chauffeured around in it! ;D
\D
LOL, yea. It gets around
Post by: jwrape on February 21, 2012, 06:29:10 am


Post by: jwrape on March 02, 2012, 07:01:50 am
Now just have to get another for the passenger side.
Driving to work and hitting the bumps that the car usually rattles over, the driverside was silent while the passenger side rattled like a 25 year old car.
LOVE this upgrade.
Striker

TO make the Ford Striker work correctly, you have to remove the plastic bushing seen above
Found the thread that I read to find this fix
http://www.fiero.nl/forum/Archives/Archive-000001/HTML/20090219-2-080920.html#p0 (http://www.fiero.nl/forum/Archives/Archive-000001/HTML/20090219-2-080920.html#p0)
Post by: Donster on March 06, 2012, 11:32:03 am
Awesome tip!
Thnx
\D
Post by: jwrape on March 06, 2012, 12:22:19 pm
Installed one in Anne's Phoenix, and sure enough, you were right Jason - no more rattle!
Awesome tip!
Thnx
\D
Cool! Thanks, I bought one for my passenger side but haven't installed it yet.
Post by: jwrape on March 07, 2012, 06:17:32 am

Post by: jwrape on March 14, 2012, 06:16:37 am
It went pretty well, I learned a few things and got a groove for it. It's definately not for the faint at heart, but it works and looks cool.
I bought gloss black vinyl but in reality it looks more like a Satin black. In the pics it looks slightly more glossy but it's Satin.
One thing is, IT"S VERY TIME CONSUMING. it took me 2 hours to do the hood.
Here's the pics
When I started, my hood looked like this:
Black Rustoleum wet sanded and smooth, with the exception of the drivers side light lid

You lay it half on starting from the middle and squeegy it out towards the ends.

Have it laid here but not all the bubles worked out

GOt it laid, 95% of the bubbles out, stretched a little where I had to.

I continued throughout the day watching it for bubbles and re-heating corners that might have come up after it sat. I drove it to work today.
Looks better after a day of sitting and laying down more.
THe one thing, if there are any un-smooth imperfections on your the body below it, it will show through.
I am going to re-do the driverside headlight cover due to rough paint under the vinyl.....
BUT it's one and really cool looking. Gonna get some more and start doing the rest of the car. BUT in my case I need to wet sand the rest of the body to get the trash out of the paint to lay the vinyl down nice.
I could leave it and cover it but then it looks like a bad paint job with trash all in it and that's what I'm trying to get away from. :-)
Post by: Donster on March 14, 2012, 06:49:00 am
\D
Post by: jwrape on March 14, 2012, 06:56:07 am
What I'm anxious to see is how well it works on the real curvy parts, like front nose and rear fascia
\D
Yea, me too. From what I have watched it will take two people to pull it from the front towards the back and stick it to the center and then stretch it over the nose. I might do that next. It will be a defining moment.
Here's an example on a Mini
http://youtu.be/Sv2y12AcygE (http://youtu.be/Sv2y12AcygE)
Post by: jwrape on April 27, 2012, 12:30:43 pm
Check them out. Gonna put them on Monday. Using my old tires. They should work just fine. BUT my main concern is I might have to run a skinnier tire in the front to get them under the fender AND I'm concered about rubbing the A-Arms. my 18x8's aready touch ever so little at full turn. These are another inch wider. Although my old rims are -38mm and these are -34mm. I plan to test fit one on the front this weekend if I get a second free. If not, Monday morning.
Cruising home

Sitting in the garage waiting on me now


------------------
Car Thread:
86 GT
http://www.fiero.nl/forum/F...ML/085541.html (http://www.fiero.nl/forum/Forum1/HTML/085541.html[/url)
Post by: Donster on April 27, 2012, 01:09:09 pm
\D
Post by: jwrape on May 12, 2012, 06:36:43 am
I had not idea it was setup wrong.
Anyways, I pressure washed my engine the other day after a transmission line popped and covered the engine in trans fluid (That wasn't fun at all).
After that my transmission started shifting REALLY quickly, too soon. I knew I needed to adjust the automatic Trans cable to shifter. I adjusted it tighter just by guessing where it should sit. I figured I would make it tight and it would self adjust if it needed it. I put it back on and the car has never shifted better in the year I've owned it. Before, in the morning, the shifts were hard and 2nd to 3rd would sometimes require a manual shifting of the shifter to get it to change. Also I had no bottom end. I would stomp it to the floor and it wouldn't kick down.
After adjusting that cable tighter, the transmission shifts absolutely perfectly and if I push the pedal down a little extra it down shifts and I get performance again. WOW. What a difference. I have thinking my GT was super slow all this time, now it feels powerful.
Auotmatic owners - adjust your cable if you aren't shifting right. I thought the tranny was old and worn, turns out it was just mal-adjusted
Post by: jwrape on July 03, 2012, 02:02:28 pm
Post by: jwrape on July 06, 2012, 09:05:48 am
http://gafieroclub.org/bbs/index.php?topic=1211.0 (http://gafieroclub.org/bbs/index.php?topic=1211.0)
Post by: Raydar on July 11, 2012, 09:57:05 pm
I just got these yesterday to set it on
Niiiice! I like those!
Post by: Donster on July 12, 2012, 06:12:53 am
;D
\D
Post by: jwrape on July 12, 2012, 06:41:44 am
I just got these yesterday to set it on
Niiiice! I like those!
Well, once again, I go to fit them on the car and they are a different lug pattern, so I will be using them on my G35 instead. It's ok, I'm not burnt. I got them cheap anyway. :-)
I figured at the price I couldn't complain about them not being the advertised lug pattern
Post by: jwrape on October 16, 2012, 06:51:53 am
I drove it to work this morning. WOW! I must say, the car doesn't vibrate, doesn't sound like a worn out glass pack and it has more pep and smooth acceleration. It's a new car. Very proud of my fix
Post by: jwrape on November 27, 2012, 08:32:57 am
Post by: Donster on November 28, 2012, 02:28:46 pm
Getting out of it completely?
Dude! That's major!
\D
Post by: Fierofool on November 28, 2012, 05:35:23 pm
Post by: jwrape on November 29, 2012, 06:22:53 am
WOW, so you are saying you no longer have a Fiero.
Getting out of it completely?
Dude! That's major!
\D
Yea, I let them know about the Club....
The guy that bought the GT is middle Easter and doesn't speak english very well. I don't think he will join. Didn't seem interested. The other SE I sold, he might but he's in College.
To say I completely out. NEVER. If a deal comes along, I'll be back. I run across them all the time. I really sold it only cause the guy was interested. I never thought it would actually sell. But I need the money right now anyways so it came at a good time.